Just because winter is here doesn’t mean the camera has to disappear
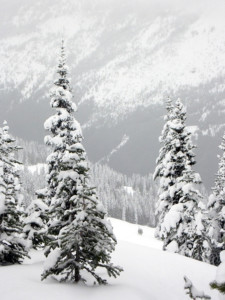
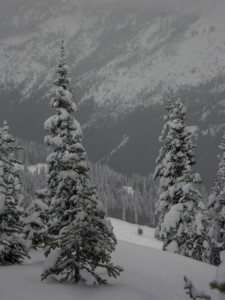
Winter has arrived and with it, the unique photographic opportunities that come with the cold, white landscapes. Whether you’re making a snowman with the family, hitting the slopes, or out for a frosty photographic journey, with a few simple tips you can have a much more enjoyable experience.Condensation In Your Camera
This one is not to be underestimated! Just like your glasses or sunglasses, when going from the hot conditions of your house or car to the cold outside, condensation can form in your camera and lenses. This is bad for many reasons in the long-term including internal spots from evaporated droplets, lens fungus and possible damage to the electronics in current cameras and lenses just to name a few. In the short-term, the condensation causes fog that you can’t photograph through until the camera temperature starts to equalize with the surroundings.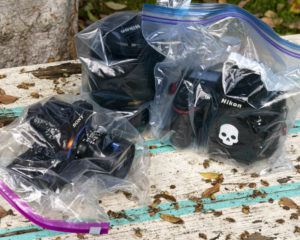 A simple way to get around this is to seal your camera and lenses in ziplock style bags until they acclimatize. This will help to stop the condensation from forming. After a few minutes, when your camera has gotten down to the surrounding outdoor temperatures, remove it from the bag and enjoy fog-free pictures! Make sure to reseal the camera and lenses in your baggies when you are headed back into the warm conditions too so you don’t get condensation forming at that point either.
Pro-Tip: This works and should also be done when going from air conditioning to hot or humid climates.
A simple way to get around this is to seal your camera and lenses in ziplock style bags until they acclimatize. This will help to stop the condensation from forming. After a few minutes, when your camera has gotten down to the surrounding outdoor temperatures, remove it from the bag and enjoy fog-free pictures! Make sure to reseal the camera and lenses in your baggies when you are headed back into the warm conditions too so you don’t get condensation forming at that point either.
Pro-Tip: This works and should also be done when going from air conditioning to hot or humid climates.
Your Batteries Hate The Cold
Today’s lithium-ion batteries are great compared to what we had even a few years ago. One of the downfalls of this battery type used in all of our cameras is it’s sensitivity to temperatures. When the thermometer starts to drop, so does the length of time a lithium-ion battery will run. The colder it is, the worse the effect. Keep a spare battery in your pocket, close to your body. This will keep it warm and when the one in the camera starts to get low, switch their positions. When the one that you just pulled from your camera warms up in your pocket it will have more life than when you removed it from the camera.Wear Thin Gloves
 When there’s not a chill to the wind but a nip to the air, I pull out a pair of knit merino wool gloves. I went to my local outdoors store with my camera and tried on quite a few before I found a pair I liked. The ones I use are thin enough that I can operate all of the buttons and dials on my camera, and they keep my hands pretty warm for how thin they are. Being knit, they do a good job of breaking up the wind and wool can retain quite a bit of its insulative properties even when fairly wet. These specific ones are even touchscreen sensitive on the thumb and pointer fingers.
The knit gloves I use also fit nicely within my bigger winter gloves. If I am in really cold conditions or out all day in the cold, I can pull out my hands to operate my camera and still have a protective layer. To add an extra layer of anti-slip protection I went to the craft store and bought a bottle of puff paint. By dabbing the inside of the glove (except for the touch-sensitive areas) with a little of this paint and smearing it into a little circle, you can add a bit more grip to the place where it counts.
When there’s not a chill to the wind but a nip to the air, I pull out a pair of knit merino wool gloves. I went to my local outdoors store with my camera and tried on quite a few before I found a pair I liked. The ones I use are thin enough that I can operate all of the buttons and dials on my camera, and they keep my hands pretty warm for how thin they are. Being knit, they do a good job of breaking up the wind and wool can retain quite a bit of its insulative properties even when fairly wet. These specific ones are even touchscreen sensitive on the thumb and pointer fingers.
The knit gloves I use also fit nicely within my bigger winter gloves. If I am in really cold conditions or out all day in the cold, I can pull out my hands to operate my camera and still have a protective layer. To add an extra layer of anti-slip protection I went to the craft store and bought a bottle of puff paint. By dabbing the inside of the glove (except for the touch-sensitive areas) with a little of this paint and smearing it into a little circle, you can add a bit more grip to the place where it counts.
Exposure Compensation
Now you are out comfortably shooting with your condensation-free, well-charged camera with toasty fingers and your images keep having a dingy grey look compared to the glorious winter wonderland in front of your eyes (and lens). If you are photographing a scene that is predominantly white, like a snowy landscape, your camera’s meter is trying to find an average “18% grey” tone. This is the dingy grey that your images end up looking like if your camera is left to its own devices. If you are in Auto Mode you should try switching to the Snow setting in your scene modes. Most cameras will have something like this although it might be called something slightly different. If you are someone that shoots in Program, Aperture Priority or Shutter Priority, then you will want to use the Exposure Compensation. Depending on your camera this might be set through the menu or through an external button or dial. It is usually signified by a +/- icon.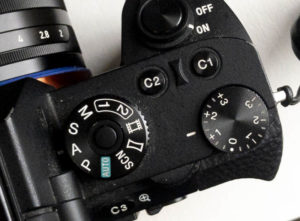 Here, you can tell the camera to add or remove a specified amount of light to what the meter thinks it should do. In snowy conditions try +1 1/3 stops brighter than what the meter thinks. This should get your snow bright white again and hopefully still keep the detail in the highlights. If you are shooting in Full Manual, try overexposing your image by the same 1 1/3 stops.