The Exposure Equation
 Once you leave auto mode behind on your camera, a whole world of creativity awaits you at your door step. This doesn’t have to be a daunting task once you have a little knowledge on your side. The fact that digital cameras keep information for each picture you take means you can go back later on and see what you changed from shot to shot and visually compare the results. This helps you learn a lot faster!
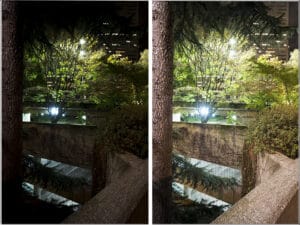 When you are taking a picture, you are only capturing the way light is falling on your subject. Once you understand a bit about controlling the light entering your camera, you can have influence on the pictures coming out of it. The darker image on the left has been taken to maintain the details in the tree near the bright lights. The image on the right has been taken 2.5-stops brighter to expose for the shadows. Some detail was lost near the lights because it is brighter, but by increasing the exposure the leading lines of the concrete and the bark of the ceder tree take on a more dominate role in the image. The brighter street lights don’t take away from the images focus, so I don’t care that they have over exposed a bit. Neither one of these is a “correct” image. It depends on what you, the artist, wants to be the subject of your image. In the darker picture on the left, the lights of the garage and the brighter tree are really the only things you see at first. When you look closer the concrete in the shadows takes on a secondary role. Overall it is a more moody shot. I was personally looking for the result on the right so for me that was the correct image.
A Few Definitions First
- A Stop Refers to 100% more light or less light entering your camera. This can be controlled by the shutter speed, ISO or aperture (more about that below).
- Exposure You’ll find this word used a couple of different ways in photography.
- – Every time you take a picture you have created an exposure.
- – The amount or balance of light entering your camera needed to make an image.
- Under Exposed When an image or an area within an image is too dark.
- Over Exposed When an image or an area within an image is too bright.
- Shutter Speed In your camera you have a shutter that opens and closes to let in light. The longer that shutter is open, the more light enters your camera. Anything that moves in front of your camera while the shutter is open will be picked up in your picture.* If your subject is a car driving by you would need a fast shutter speed to freeze the fast moving vehicle. Even though most pictures are taken in fractions of a second, with a fast moving subject 1/30 and 1/500 of a second can make a big difference. Depending on the camera though, the shutter speed might not always be represented as a fraction, but when you hit one second and longer there will always be quotation marks following the number to indicate seconds. You can read more about the shutter speed here.
- Aperture In the lens there are little blades forming a circle (roughly) that open and close to let in more or less light. If you have the aperture open wide it lets in more light. The number that represents your apertures opening will often but not always have the letter F preceding it. It is often referred to as an f-stop. The lower the number, the bigger the opening in the lens. The bigger the opening in the lens, the more light enters your camera. You can read more about how the aperture effects your depth of field here.
- ISO This is an indicator of how sensitive to light your camera is. The higher the number your ISO is set to, the more sensitive to light your camera is. In a digital camera you need to be careful when you reach to the higher ISO settings. A side effect known as noise (a visual distortion) becomes more present, especially in the shadows or darker parts of your image. With most current cameras you can shoot at 1600 or 3200 ISO before this noise becomes very noticeable. Some cameras are much better than others when it comes to handling high ISO shooting with low noise.
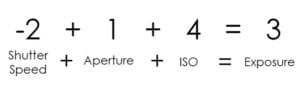
Now, let’s make some sense of that math problem I threw at you in the beginning.
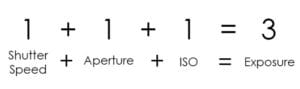
Imagine each variable of your exposure (shutter speed, aperture & ISO) in place of the 1’s and the 3 is your overall exposure (these are hypothetical numbers). As long as you still have the same sum, you can do anything you need to with the exposure variables to achieve the effect you are looking for.
Let me give you an example
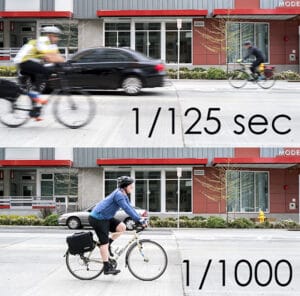 In the example on the left the shutter speed on the top image is set at 1/125 – too slow to freeze the action of the bicycles and car whizzing by. By raising the shutter speed three stops to 1/1000, the shutter is not open as long, therefore objects moving faster in front of the camera can be frozen more easily. Since it takes the same amount of light to make a picture, I need to add three stops to my exposure to compensate for the light I took away or else I would have a dark or under exposed image. In the equation below you can see that I raised my ISO by the same 3-stops that I took away from my shutter speed to achieve the same exposure in both images.
Variables and Constants
If you think about these different parts of the exposure as variables and constants, you can easily understand how to create the effects you are looking for in your pictures. With our bicyclists above, we needed to have a fast enough shutter speed to freeze the action. By taking a couple pictures at different shutter speeds while bicyclist passed by and looking at the screen on the back of my camera, I found that 1/1000 was just fast enough to freeze them in place. In this instance the shutter speed is a constant in this image. If I go any slower they will be slightly blurry and it will effect the way the image looks. Now if the image is too dark, I have two other parts of my exposure I can change to compensate for that. I can open my aperture to let in more light or I can increase my ISO to make my camera more light sensitive. In the above image I chose to increase my ISO to add the three stops of light back to the image. I could of opened the aperture one stop to let in a little more light and added 2 stops to the ISO and I would of still had the same exposure because I added back a total of 3 stops still to compensate for that faster shutter speed. Even the crazy looking exposure equation below with 6 stops added to the shutter speed and the remaining amount taken from both the ISO and aperture is still a balanced exposure.

Counting Your Clicks
After you’ve found the exposure you like, this is the secret to quickly finding that balanced exposure when you want to change a variable. When you move the dial on your camera it makes a click. You can feel it each time you rotate the dial and a number changes. Most cameras are set up so three of these clicks equals one stop. You can look in your set up menu in your camera to see how yours is set or you can try rotating the dial that effects shutter speed and see how many clicks it takes to go from 1/125 to 1/250. If you are trying it with your aperture, see how many it takes to go from f5.6 to f8. These are both a one stop difference. Occasionally camera’s or lenses are set up for 2-stop increments. Once you know how your system works, you can easily count your clicks back to balance.
Lets look at that crazy exposure equation again to see how many clicks we would feel for each adjustment. Lets assume the dial clicks three times to equal one stop like on most cameras. For the shutter speed we have a 6 stop difference. 6 (stops) x 3 (clicks per stop) = 18 clicks. When you are headed into the negative in our equation above, don’t forget to also count the zero. For the aperture 2 (stops) x 3 (clicks) = 6 clicks. And finally our ISO would be 4 (stops) x 3 (clicks) = 12 clicks.
Changing Exposure
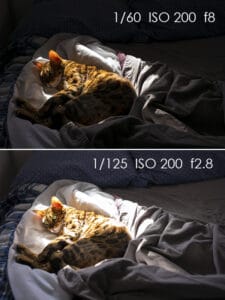 So far we have been talking about keeping the same exposure in your image. Keeping the “clicks” even when taking from one variable and giving to another means the balance of light in your image should be the same. If you want your image to be brighter or darker than your last shot, you would take away more or less from one side of your exposure versus the other. You would have an uneven balance. In the example on the left, the first image was well exposed for the detail in the fur and the sheets, but I wanted to capture the way the eyes were glowing in the shadow as they gathered the reflecting sunlight. To achieve this I needed an exposure 2-stops brighter than my first.
Remember that these 1’s that we have been adding are arbitrary numbers. By using a 1 in the first examples, it is easy to come up with a sum of 3. Let’s use zero’s now to represent our even exposure as to not confuse the math.
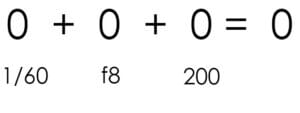 If this is the first image we shot and we wanted to keep the same balance of light as the first, but open the aperture on the lens to blur the background a little more. By counting our clicks like before and keeping an even number added to one exposure variable and the same increment taken from another, I would have the same dark exposure, but with a little less depth of field.
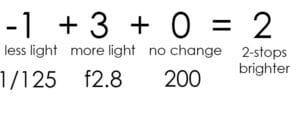 Here I did open the aperture up from the original f8 to a much wider f2.8. This is 3-stops more light coming in through the wider aperture in the lens now. To get the eyes to pop on my lazy model, I only needed 2-stops, any more and I would of blown out the detail on the sheets and fur. To compensate for the extra stop of light I was taking in now with my f2.8 aperture, I raised the shutter speed to 1/125 – a 1-stop difference. By adding 3-stops to the aperture and taking away 1-stop from the shutter speed, I ended up with the 2-stop brighter exposure I was looking for, and also was able to create a more shallow depth of field to isolate the cats eyes more from the background.
Get Out And Experiment!!!
Okay, you have a better understanding of how to manage your exposure. If you clicked the links within this post and the ones within them, then you either have an information overload, or you are itchin’ to get out and try what you have just read. Whichever it is, make sure to experiment with you’re photography, and try a couple different things with the same shot. You’re going to mess up some shots and you’re going to get a few cool ones along the way, too. At least you’ll be learning something while you are out. When you look at the images back home along with the exposure information that your camera records with each shot you take, you will hopefully start to see things a little differently when you are wandering with your camera.