I have worked in the camera industry for almost 15 years, and watched the evolution from film to digital take place. It doesn’t matter if I was behind the counter selling cameras at stores or these days if I am teaching a class or a workshop, when you say, “Shoot RAW, not JPEG,” there are always gasps of opposition to it. “But I have to edit every photo,” they say. “The files are sooooo big!!!” is intoned over and over. I myself, what seems like eons ago, was one of those people. Once I learned what a RAW file is and exactly why its a better way to capture images I never went back to shooting JPEG’s.
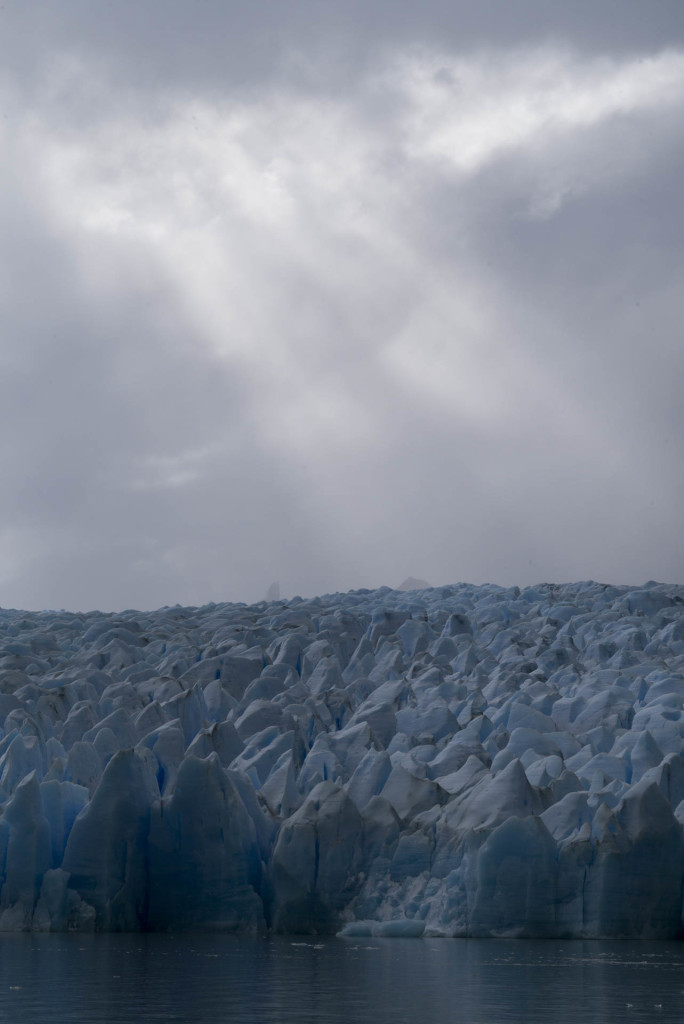

Here is an example of the power of RAW. When I was taking the image on the left I wanted to make sure not to loose the sunlight spilling from the clouds so I underexposed a bit. Because of the amount of tone each pixels can create in a 14-bit RAW (you will understand what this means very soon), I knew I would have enough detail left when I hit the editing stage to keep the highlights in the sunlight and also see the vibrant blues of the glacier below. Now there are always the people that love the argument of, “I never edit my images,” usually said in a smug and egotistical way like it is something to be proud of. In the days of film, if you were an avid photographer you would do the same thing I did above in the dark room. If you were a more casual shooter, when you dropped off the film to have your prints made, there was a person behind the counter adjusting everyone of your images to make them not look terrible. Trust me, I worked at places like that for years, its amazing what those guys could do! In today’s digital age programs like Adobe Lightroom replace the the darkroom of yesteryear. When you set your camera to JPEG and tell it to make the image vibrant, it is doing more processing in camera than I am to the examples used in this article.

In this example the abilities of a RAW file are even more obvious. Not only could I pull immense detail from the areas with highlights and shadow, but the ability to adjust white balance allowed me to fine tune the color of the image for the conditions to keep a natural look.
It all comes down to a simple numbers game. In photography you are only capturing how light falls on your subject. Color is just light in different wavelengths reflected off of an object, seen by the human eye and interpreted by the brain. Your camera’s eye is it’s sensor and it’s processor is the brain. The sensor is made up of light sensitive pixels that record the light and then the processor converts that analog information from the sensor into a digital signal. As with anything digital, your picture is now made up of 1’s and 0’s. This is where the difference between a RAW file and a JPEG begins and what this tutorial is really about.
The term bit depth refers to each pixels ability to create tones. Lets say that in a digital language, the 1 represents white and the 0 represents black. If you had a bit depth of one, you only have two tones, black and white. Not a black and white image with all of these greys in between, just black and white. If you have a bit depth of two, you have two numeric slots. In a digital representation this would be two places for a 1 or a 0. A bit depth of 2 would look like this: 00, 01, 10 or 11. That extra slot just gave us four options instead of two and in the world of photography this added two grey tones to our palate. Still not a black and white that Ansel Adams would be displaying, but you can start to see more detail. Now lets think of this in an mathematical form. A bit depth of 2 is the same as 22. Think of it like two options per slot, with two slots. Even if you don’t know much about math, everyone knows that when you see exponents, numbers can get big quickly. If you were to have a bit depth of 8, it wouldn’t look like this 82=64 but 28=256. This is what you have when you capture an image in JPEG; 256 different tones that make up your image because JPEGs are 8-bit files. Now that is certainly a lot more detailed than our 2-bit image with black, white, light grey and dark grey. It is impossible though to have any more than 256 tones in a JPEG because, you know, math.
Now when you start talking about RAW files our exponents start getting bigger and therefore so do the tones making up your image. The smaller of the RAW files in most cameras will be 12-bit and the larger is a 14-bit. If you get into some crazy expensive cameras you will be in the realm of 16-bit, but we won’t be talking about that here. When you make the jump from a JPEG at 8-bits to the 12-bit RAW you go from 256 tones to 4,096. That is a huge increase in both the subtlety of colors in your image but also the bright and dark areas in your images have much more range. When you go from 12 to 14-bit, now you have 16,384 tones to make up that image. In a landscape with a sunset, those clouds near the sun and the shadows on the back side of that rock or log all have more detail for you to be able to pull from when editing your image. The sun reflecting off a white baseball and the shadowed side of your child’s face during their first t-ball game all have more detail. The way the colors of the flowers in a field range from deep maroon to vibrant scarlet are captured with a smoother transition between those red. This ends up having a more natural look in your image.
RAW. I know. It’s still a pretty scary word. RAW. There, I said it again. If you haven’t been scared away yet, there is still hope for you! When it comes to the editing side of things, if your memories aren’t good enough for you to invest a little time in, put that beautiful interchangeable lens camera that you poured all of that hard earned money into down. You might as well be picking up your phone and shooting that same picture with it. I mean come on, if you’re going to let the thing do all the work for you, you might as well, phones do a pretty good job these days at snap shots. If the picture you take means something to you, then you might as well put a couple minutes into it to make it the best you can. You’ve already invested the time to take it, why stop half way to the finish line?
Part of the advantage of a RAW file is that when you are editing it (a term used loosely as you will see) nothing actually happens to the original file. There is a sidecar file that sits next to your RAW and will have the same name as it, but this sidecar will have .xmp for the file extension. This is a set of instructions for whatever editing program you are using to tell it what adjustments you have done to the image. The beauty of this is you always have an untouched version of the original image. Once you save a JPEG file, it bakes the changes into the image and there is no real way to go back (there are many lossless JPEG editing programs today, ie Adobe Lightroom but that’s a different tutorial). There are also many advantages to the editing of a RAW file other than the tonal range such as white balance adjustment after you’ve taken the image. In a JPEG you are adding blue or yellow to your image to try and fix orange family members in a living room. In a RAW file you can actually change the white balance of the image to make it look more natural. There are many other advantages to using a RAW in the editing stage you will learn with time. If you are still a little wary about going into full RAW all the time, most cameras these days can take both a RAW and a JPEG image at the same time. This will take more memory, but you will have the RAW to play with and learn from and the JPEG as a familiar back up. When it comes to the time side of editing, you aren’t editing all 240 photos you took at the t-ball game, you are only editing a few of the good ones. Aren’t they worth a little time to make them look the best they can?
When it comes to the topic of file size and memory, hard drives and memory cards are cheap these days! A 32GB memory card from a reliable brand is under $30 and the average camera can take more than 1500-2000 images on one in RAW. At home a hundred bucks will get you 3 terabyte external hard drive. For the average user, that will be more than enough for every vacation, family outing, work get together, t-ball game and photo workshop (with Light Source Journeys of course) you will ever go on. When you’ve already spent many hundreds if not thousands of dollars on your camera gear, your system isn’t complete until you have somewhere to store those images. I would even recommend getting a second external hard drive to copy the contents of the first one to. If something happens to it, you haven’t lost all of your images.
I hope this gave you a bit of an idea what a RAW file is and if you were intimidated by them before, hopefully you are willing to give them a go. When I started down the daunting path to RAW shooting I started with the coupled JPEG files for peace of mind. After about two months I realized I wasn’t using the JPEGs anymore and started just shooting RAW. Step slowly into it, but I can guarantee once you do your photography will never be the same!