5 Tip for Better Portraits (Even With Your Phone)

When photographing our friends and family (even with your phone), there are some simple rules that you can follow to help make your photos stand out. 1 – Don’t Let Thing’s “Grow” from People One of the more common mistakes I see in photographs of people are objects like telephone poles or trees “growing” out of people heads. Being aware of your background is crucial to any photograph, ones of your friends or family are not exempt from this rule. When taking pictures of people we often get lost in trying to get everybody in the shot, ignoring the background entirely. Now that you are looking at your background, try and find a placement that a tree looks like it is taking root in the ground rather than your friends head. 2 – Try Indirect Lighting Sunlight can appear very harsh in a portrait, especially if there are heavy shadows in your image. Try placing your subject(s) under a tree or an awning. This will help even out the lighting on your subject and depending on how bright the scene behind you (the photographer) you may even have a catch light in the eye. If you photograph closer to sunrise or sunset during the time known as the golden hour, the difference from light to shadow is less intense. 3 – Avoid Having Your Subject Looking Into the Sun As an instinct, I think people generally want to put a whole bunch of light on their subject. Having everyone in your shot squinting into the sun doesn’t result in a good image, nor is it a pleasant experience for you subjects. If possible, try the above step, but if you are in a wide open area and can’t get to cover to help diffuse the light, try turning your subject to the side a bit. Both your image and your subject will be better off for it! 4 – Make Sure Your Subject Doesn’t Get Lost in the Scene Unless you are trying to capture the grandeur of a landscape with your subject included in the scene, move in on your him/her and eliminate a lot of the background. Having a person or even a few floating in the middle of the frame isn’t doing anyone any favors. 5 – Shoot for People’s Personality In a portrait you are photographing a person not an inanimate object, make sure your image reflects that. Rather than starchy poses and unnatural body positions, let your subjects be themselves in your images. Of course if you are trying to achieve a formal portrait of your family, this might not be the best advice to follow, but otherwise let the people in your image show who they are. Not only will they be more willing to stand in front of your camera more often, but the images will evoke more memories of the way people are rather than just what they look like.
Photos and Art…Taking Pictures in a Museum
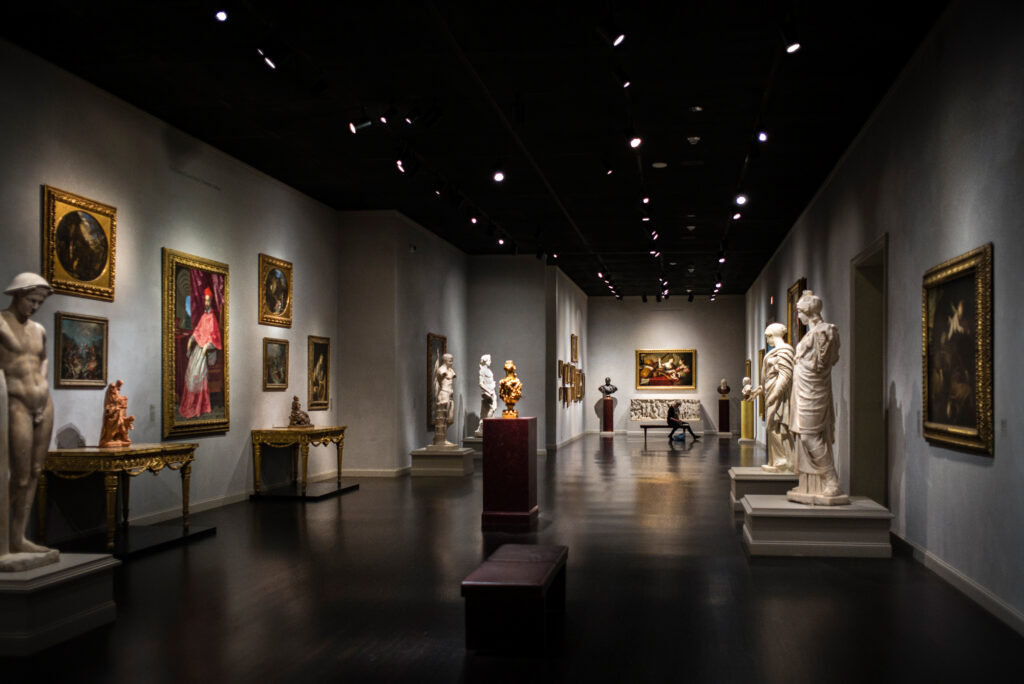
I am an avid museum goer. I have a membership to the Seattle Art Museum, and try to visit as many different museums as possible while I am traveling. In the past month I have been to The Seattle Art Museum (twice), the Portland Art Museum, San Francisco Fine Arts Museum, The Martin Lawrence Gallery in Las Vegas (not a museum but more fine art on display than most museums), The UCLA Hammer Museum, The LACMA, The Petersen Automotive Museum (rolling art), The Broad and The Getty. As long as it is post 1700-ish (religious or portraits of kings or random wealthy people are not my bag) I can stare into paintings all day. I can peer in to the abyss of a Van Gogh and the way he uses bright colors along with the depth and texture of paint to create light, shadow and direction within his paintings. I love the way you can tell roughly how old Monet was when he painted his canvases depending on how blurry it was. Sure an impressionist painting is made up of many dots and dashes to begin with, but his failing eyesight later in life caused his paintings to become more and more of an impression over time than an actual representation of the subject matter. I love the way you can tell a Degas from the oddly contorted and uncomfortable looking poses the women are often depicted in regardless of their activities. I also love street and environmental photography. I find it almost like a meditation to wander around with my Leica camera attached to my hand like an extended body part and capture the world going on around me. Museums are great places to shoot environmental photography. The architecture and lighting are usually dramatic and tend to work well when it comes to creating imagery. Unless it is otherwise noted, you are allowed to take pictures with no flash in any museum! Aside from the art surrounding you and the there is a whole world of photo fodder at your fingertips. Most art museums are designed to be architectural wonders themselves. By using the shapes or lines within these often breathtaking buildings, you can add a whole new element to your photography. When you are surrounded by such a diverse amount of creativity, you can’t help but to be inspired. And after all, art breeds art, doesn’t it?
5 Quick Tips For Better Landscape Photos
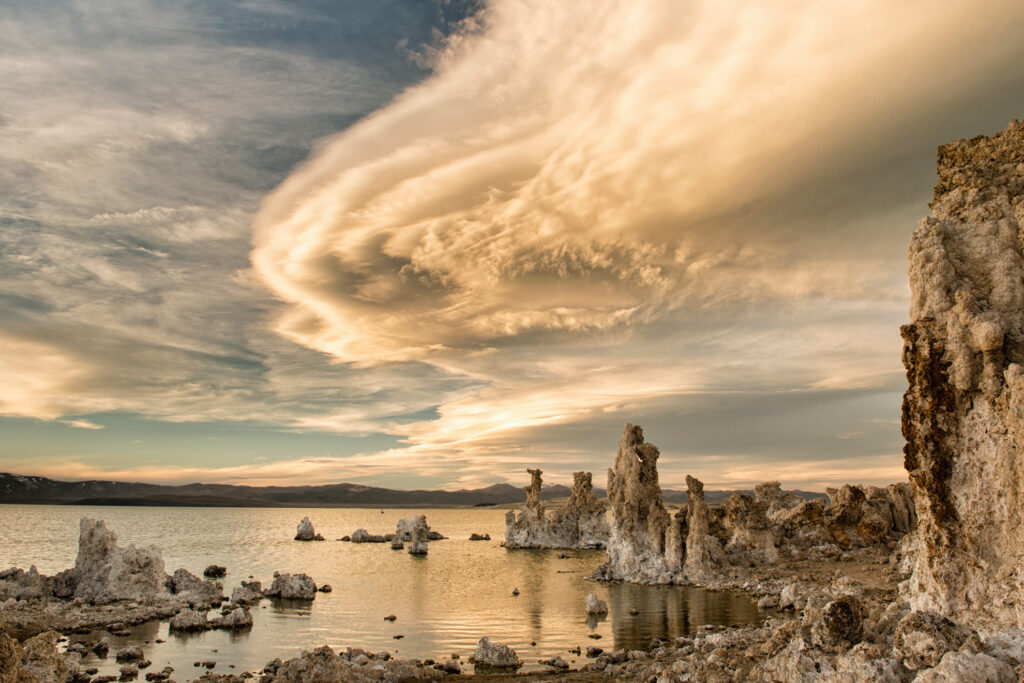
There is nothing better than capturing a beautiful sunset or the way the light is catching that cloud during your hike. There is nothing worse than getting back to show your friends or family the grandeur that you’ve witnessed only to present them a photograph that doesn’t come close to representing the display mother nature played out in front of your eyes. By following some simple rules you can increase your likely hood of capturing that amazing scene with your camera that your viewers can’t get enough. For a more in-depth description, click on the blue links. Keep that Horizon Out of the Middle When it comes to composition, maintaining the rules of thirds is a good start to a pleasing appearance. By taking the horizon out of the middle of your image and placing it close to an imaginary line dividing your image into 3 parts, the viewer will usually stay engaged longer in the image. If you have a perfect mirrored reflection in a lake, this could be a great time to throw this rule out the window and use the symmetry you’re being presented with, but in most cases, the rule of thirds is very pleasing. In the image to the left, the foreground (brown area) occupies the bottom third, the clouds another third and the starry sky, the top third. The main features like the arch, tree, and moon all fall along the lines dividing the image into thirds. Use Leading Lines to Draw the Viewers Eye By using elements within your image to draw the viewer’s eye, you can lead them through your photograph to the subject you intended. These are called leading lines. Diagonal lines offer quite a bit to a composition, and by using them within your images you can create a much stronger composition. In this image, many diagonal lines within the composition lead your eye to a central point. Anchor Points Well, you’ve managed to get the viewer to look somewhere in your photo, now how do you keep them looking at it longer and more in depth? After you’ve led their eye somewhere with your strong diagonal leading line, you need something for them to return to. This is where anchor points come in. This is an element of the image that draws you back away from the direction your eye wants to gravitate, allowing you to keep the viewer’s eye moving through the photo. In this image, the pink reflection and light colored rock at the bottom grab your attention to return your gaze from the colorful sunrise over the mountains. Bad Weather Can Mean Great Pictures When storm clouds are heading your way, the first instinct is usually to pack up that camera gear and head inside. Fight the urge I tell you! When the weather takes a turn for the worse, moving clouds can create some dynamic lighting and dynamic lighting can create some stunning imagery. How many rainbows have you seen on a bluebird day? Use Your Shutter Speed to Tell a Story In most cases, this will require a tripod or at least a good stable surface to rest your camera. You have three main elements at your disposal to create the image your mind’s eye is seeing when taking a photograph shutter speed, aperture and ISO. By altering the shutter speed you can determine if the moving water in your shot is displayed as droplets frozen in time or if it takes on a more wispy and painted look. When your shutter is left open for a longer period of time, it is capturing anything passing in front of the lens until it closes. With a longer shutter speed, it will capture all of the movement, in this case, waves crashing over rocks during sunset. Here the longer shutter speed allows the motion of the water to cascade over the rocks in the foreground while it is still fast enough to capture waves in the background.
Making RAW Files Less Scary

I have worked in the camera industry for almost 15 years, and watched the evolution from film to digital take place. It doesn’t matter if I was behind the counter selling cameras at stores or these days if I am teaching a class or a workshop, when you say, “Shoot RAW, not JPEG,” there are always gasps of opposition to it. “But I have to edit every photo,” they say. “The files are sooooo big!!!” is intoned over and over. I myself, what seems like eons ago, was one of those people. Once I learned what a RAW file is and exactly why its a better way to capture images I never went back to shooting JPEG’s. Here is an example of the power of RAW. When I was taking the image on the left I wanted to make sure not to loose the sunlight spilling from the clouds so I underexposed a bit. Because of the amount of tone each pixels can create in a 14-bit RAW (you will understand what this means very soon), I knew I would have enough detail left when I hit the editing stage to keep the highlights in the sunlight and also see the vibrant blues of the glacier below. Now there are always the people that love the argument of, “I never edit my images,” usually said in a smug and egotistical way like it is something to be proud of. In the days of film, if you were an avid photographer you would do the same thing I did above in the dark room. If you were a more casual shooter, when you dropped off the film to have your prints made, there was a person behind the counter adjusting everyone of your images to make them not look terrible. Trust me, I worked at places like that for years, its amazing what those guys could do! In today’s digital age programs like Adobe Lightroom replace the the darkroom of yesteryear. When you set your camera to JPEG and tell it to make the image vibrant, it is doing more processing in camera than I am to the examples used in this article. In this example the abilities of a RAW file are even more obvious. Not only could I pull immense detail from the areas with highlights and shadow, but the ability to adjust white balance allowed me to fine tune the color of the image for the conditions to keep a natural look. It all comes down to a simple numbers game. In photography you are only capturing how light falls on your subject. Color is just light in different wavelengths reflected off of an object, seen by the human eye and interpreted by the brain. Your camera’s eye is it’s sensor and it’s processor is the brain. The sensor is made up of light sensitive pixels that record the light and then the processor converts that analog information from the sensor into a digital signal. As with anything digital, your picture is now made up of 1’s and 0’s. This is where the difference between a RAW file and a JPEG begins and what this tutorial is really about. The term bit depth refers to each pixels ability to create tones. Lets say that in a digital language, the 1 represents white and the 0 represents black. If you had a bit depth of one, you only have two tones, black and white. Not a black and white image with all of these greys in between, just black and white. If you have a bit depth of two, you have two numeric slots. In a digital representation this would be two places for a 1 or a 0. A bit depth of 2 would look like this: 00, 01, 10 or 11. That extra slot just gave us four options instead of two and in the world of photography this added two grey tones to our palate. Still not a black and white that Ansel Adams would be displaying, but you can start to see more detail. Now lets think of this in an mathematical form. A bit depth of 2 is the same as 22. Think of it like two options per slot, with two slots. Even if you don’t know much about math, everyone knows that when you see exponents, numbers can get big quickly. If you were to have a bit depth of 8, it wouldn’t look like this 82=64 but 28=256. This is what you have when you capture an image in JPEG; 256 different tones that make up your image because JPEGs are 8-bit files. Now that is certainly a lot more detailed than our 2-bit image with black, white, light grey and dark grey. It is impossible though to have any more than 256 tones in a JPEG because, you know, math. Now when you start talking about RAW files our exponents start getting bigger and therefore so do the tones making up your image. The smaller of the RAW files in most cameras will be 12-bit and the larger is a 14-bit. If you get into some crazy expensive cameras you will be in the realm of 16-bit, but we won’t be talking about that here. When you make the jump from a JPEG at 8-bits to the 12-bit RAW you go from 256 tones to 4,096. That is a huge increase in both the subtlety of colors in your image but also the bright and dark areas in your images have much more range. When you go from 12 to 14-bit, now you have 16,384 tones to make up that image. In a landscape with a sunset, those clouds near the sun and the shadows on the back side of that rock or log all have more detail for you to be able to pull from when editing your image. The sun reflecting off a white baseball and the shadowed side of your child’s face
Seeing Light at Night
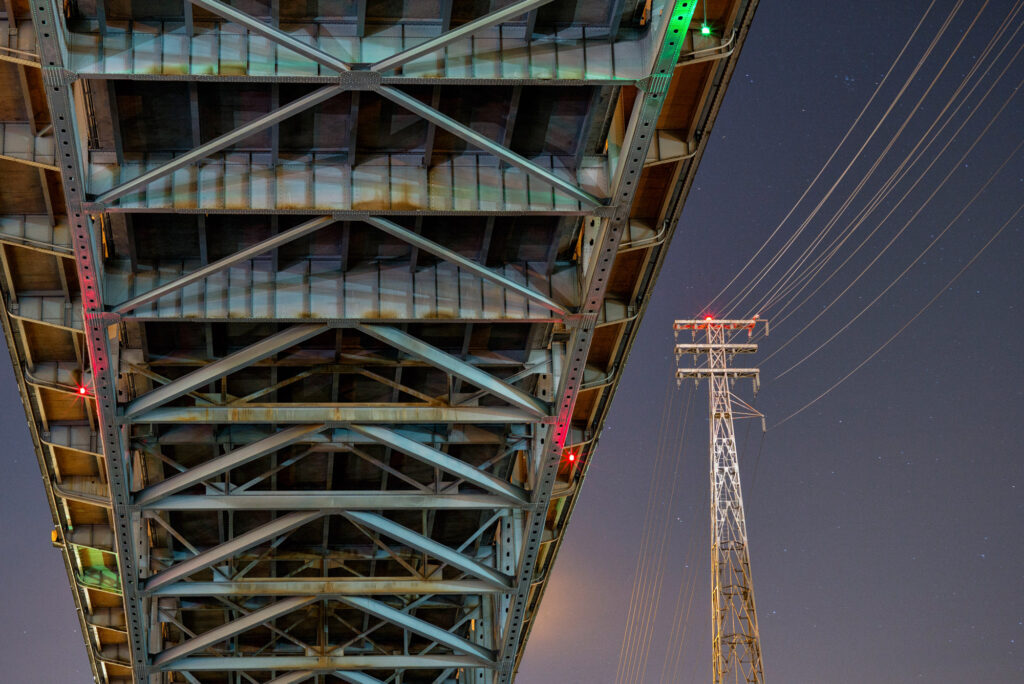
Just because the sun has gone down doesn’t mean its time to put the camera away Whether I’m out in nature or wandering a city, I am just as likely to be spotted with my camera and tripod close by at night as I am by day. Not only do you tend to have places that by day might have hundreds if not thousands of people roaming around and taking similar photographs to yours, you also have an opportunity to see and capture light differently than most people ever will. After all, no matter what time it is you are creating an image; you are only capturing how the light falls on your subject. In fact the word photography literally means to draw or write with light. At night subtleties of light and color are much more pronounced and the dynamic range of your scene (the difference from bright to dark areas) can be closer than daytime creating a surreal look that leaves your viewer captivated and often a little confused at the image they are presented with. Both of these images were taken at the same location a couple of days apart, and there is a dramatically different look to the same subject matter. In both images, the moon assumes a roll like the sun would in a daytime landscape. In the image above, clouds add to a sunset like effect and soften the light falling on the foreground. Only when the eye travels towards the stars in the upper portion of the image does it become clear that this photograph was taken at night. In the image to the left, a mid to high aperture setting (in this case f8) creates the starburst exploding from the moon giving it a sun-like appearance. With no real cloud cover to speak of, the harsher less diffused light on the foreground creates much more contrast with the shadows giving a pronounced separation to the canyons and valleys. In an urban environment, you have even more to consider Here the moon phase won’t make as big of an impact as the differing colors of light present in a city. If you take a close look at the streetlights around at night, you will see ranges of yellows and oranges to more white and even greenish lights. Sometimes you have cloud cover to reflect the city’s ambient light and other times on a cloudless with nothing to bounce light back towards your lens you’re left with a black void behind your subject. All of these elements will play into your final image. The surrounding lights are casting a blue hue on some of the steel supports for the highway above while the other side is bathed in a warm yellow that contrasts against the blue. The red and green lights on the bridge and tower still have fine star points despite the lens being shot wide open. Had I used a higher aperture they would be even more defined. Those same red and green lights add all sorts of colored accents to shadows under the bridge. The high-tension wire’s frame is illuminated by the orange sodium vapor lights on the highway along with the more white headlights of the oncoming cars traveling above. This creates brighter spot that draws the eye to a simpler counterpart to balance the busy subject matter of the bridge. During day, this bridge and these power lines look just like that, a bridge and power lines. After the sun has set, this bridge scene explodes with color and subtleties that can only be captured at night. The direction of light and shadow Like daytime, at night the direction of light plays into the mood you are trying to create for the viewer as well. In the image on the left an aperture of f7.1 was used to turn the moon into a sun-like burst between the Moai of Easter Island. Over the 20 seconds this image took to expose quick moving clouds pass to create a streaky look. By exposing for more of the clouds than anything else in the image, the ancient statues take on a mysterious silhouette in front of the wispy clouds. At the top of the image the pinpoints of stars bring a motionless balance to the Moai. By opening my aperture to f4, raising the ISO a bit and placing my light source (the moon) at my back, the same subject takes on a very different feel. Now the details of the statues become visible along with the foreground and stars. With the same shutter speed of 20 seconds, the clouds keep their wispy character.
Backing Up Your Images – Protecting Your Memories
Think of your favorite photograph that you’ve ever taken. It might be an epic sunset or it could be your children peacefully playing in the park together. It might be of a majestic lion you encountered on a once in a lifetime safari, it’s mane blowing in the dry winds of the Serengeti. Think about how that image and the other images like it that transport you back to another place and time make you feel when you look at them. Now imagine never seeing that image again. In today’s digital age, backing up your files is important. Your images, in addition to almost all of your important information, is nothing more than data; one’s and zero’s that make up your life. If you only have information like this on your computer and an issue occurs like a hard drive crashing, you can loose everything! Luckily there are many ways to ensure that your images and other important data are going to be around for you in the future regardless of what happens to your computer. Different Types of Storage These days there are external hard drives – both solid state and traditional moving drives- along with cloud services that you can use for your storage medium. Each of these can have their advantages and disadvantages but after taking a look at your needs along with the different storage options available, you’ll find there’s a back up method or a combination of different methods that work for you. Lets start by looking at the oldest and still to date most common way of backing up your images (and files in general) – the external hard drive. These are fairly inexpensive these days and available in a few different formats. There are two main physical sizes of external hard drives, 2.5″ and 3.5″. Traditional (Moving) Drives The 2.5″ external hard drives are the same size hard drives used in most laptops and offer better portability because of their smaller physical stature. 2.5″ hard drives are powered by your computers USB port so you don’t need any external power to run them (if you use a USB hub, you may need a powered hub for these drives). Some of these portable hard drives even offer impact resistance and weatherproofing. Most hard drives are a little disk spinning around thousands of times per second and because of this they can be easy to damage. The downside to these smaller drives are they can be more costly than the equivalent 3.5″ drive and are not available in the largest of sizes. Today’s portable drives can be purchased into the multiple terabyte ranges making them large enough for the average persons needs. If you aren’t taking your drive with you, a 3.5″ external hard drive can be both a less expensive option per gigabyte than its smaller counterpart and also available in faster options. When dealing with large files this speed can really pay off. These larger hard drives do need to be plugged into a power source and also are more delicate than most 2.5″ drives so they are generally used in a static location like a home or office. Solid State Drives The memory card that your camera takes doesn’t have any moving parts and because of that it is very durable. When you hear the term solid state, that is what it is referring to, a hard drive like your memory card with no moving parts. These are going to be the size of the more portable 2.5″ drives in most cases and will have faster working speeds than moving hard drives. Solid state drives are still very expensive compared to traditional moving drives and can’t be purchased in very large sizes yet. For example at current pricing (summer 2016), a 1TB 2.5″ portable drive is about $60, a 3.5″ 3TB is also about $60 and a 1TB solid state drive is about $320. That solid state drive can certainly be more durable and also be much faster at transferring data when you are using it, but you really have to need it at that price difference. Web Storage and Cloud Services Another great way to back up your files is cloud storage. By uploading them to the cloud you don’t have to worry about a physical hard drive and it’s limitations for space or possible lifespan. Depending on how many images you have this can end up being a costly option. There are plenty of services out there that offer cloud storage from Adobe and Amazon to Apple and Microsoft and many, many, more. Most of them do the same thing; allow you to upload information to an online data storage service. A lot of these services will allow you a certain amount of data for free, but then charge a monthly fee depending on how much you have uploaded after that. If you have an Abobe CC subscription for instance you get 5GB of Adobe Cloud storage along with your subscription. A huge advantage to the Adobe Cloud is its ability to be synced to your Lightroom catalog at home and the ability to edit connected images or show images to people via your mobile device with your Lightroom adjustments. If you have an Amazon Prime membership you can upload an unlimited amount of image files to their cloud at no additional charge. This is limited to still image files though, so if you want to have your videos or important documents backed up too, then you have to move to the fee based service. If cloud storage ends up being your main back up method, do a little research into the different companies out there offering this service and see which suits you best. Look into both what kind of storage you need now and how much you think you will use in the future. Be realistic about the amount of data you need to back up to avoid any surprise charges. I would not use this
How to: Rear Illuminated Foliage

I live in the beautiful Pacific Northwest. This has incredible advantages in the summertime if you are the outdoorsy type of person, which I just happen to be. During the fall, winter and spring, however, it tends to be both grey and drizzly along with darkness falling fairly early – the sun sets earlier than 4:30 pm in the middle of December. When I am actually at home during this time of year and not out roaming other parts of the world with better weather, I will often try to think of things to challenge my creative side and I’ll usually end up learning something about photography or lighting techniques while doing it. I have an area in my house I can turn into a tabletop studio and this has been the breeding ground for all types of images during the dreary time of year in the PacNW. From elaborate scenes with wooden art manikins (that’s not playing with dolls, right?) where the entire landscape is made from edible components to neon backlit water droplets. When you look around a bit you can find quite a few creative people out there with cameras. Many of the ideas for these experiments were spawned from hours of perusing photo challenge sites. I am curious by nature so I would try to figure out how they created such an image, and then use these times as my testing grounds for new techniques. Combine that with items found around the house and the results can be fun, and often surprising. Early on in my experimentation with landscape photography, I realized that foliage is much more eye-catching when it is backlit. If you photograph a tree or a field of flowers with the sun behind your subject, the leaves and petals glow. This is all well and good when you are taking a shot of cherry blossoms during the light of golden hour, but I grew interested in the intricacies that make up the leaf or the pedal. If you have ever tried to take a macro photo outside, you know that the slightest breeze will cause your painstaking efforts to achieve focus to be gone with the wind. The other obstacle you will likely run into is the curvature of the leaf or pedal. In macro photography, you have a fairly narrow depth of field, even at higher apertures. There are techniques such as focus stacking that can help you get around this for some purposes, but in my case, I am trying to take a single image that has the look I want. I had a couple pieces of broken glass from old frames, so I gaffers taped the edges for safety and clamped them together with the leaf in between. This held the leaf on a flat plane. At first I set up an elaborate rig to hold my flash behind the flattened foliage (pictured right), but in the long run, I found it more useful to just hold the flash. Every time I would move the flash, different highlights and shadows would totally change the look of the image. Logically speaking this makes sense; move the light source and the shadows will also move. When I saw it happen first hand, I was stunned at the variations playing out in front of my eyes. I ended up just hand holding the flash so I could easily change the angle of light from shot to shot. Below you can see a leaf photographed with the flash on the camera side and then three examples of the same leaf with rear illumination. The only thing that differs from shot to shot is where I held the flash to alter the angle and steepness of shadows and highlights. Steeper angles, almost parallel to the leaf, yielded far more dark shadows which help give striking texture to the image. If I kept the steep angle but went from the left to the right or above with the flash, I would get incredibly different looking images. Some of these almost look like a map in a post-apocalyptic video game with toxic rivers and scorched hillsides or like dinosaur skin (at least the dinosaur skin I’ve seen). The camera set up that you see in the picture above was a Nikon D300 with a 105mm 2.8 AF Micro Nikkor and 2 older extension tubes, a Nikon Pk-13, and Pk-11a, that I picked up used at a local camera store. These extension tubes shift back where a lens focuses. Let’s say your lens could focus from 2ft-infinity. Depending on the depth of the extension tube, this may change your close focus from 2 ft to 3 inches. Your ability to focus at infinity also changes though. Now you may only be able to focus out to a foot or so. If you don’t have a macro lens for close up pictures, this is a relatively inexpensive way to get a close perspective. When using these extension tubes with a macro lens that already has a very close focus, it will have a magnifying effect on the subject. For the flash I am using a Nikon SB-800 that is being triggered by a pulse of light from my on-camera flash just before the picture is taken (Nikon’s CLS). I have it set manually so it doesn’t change the output from shot to shot. If your camera doesn’t have a wireless flash triggering ability, you can usually find a cable for about $20 that will connect your flash to your camera’s hot shoe and let you move it around while still allowing it to fire. If you don’t have a flash already and are just wanting to experiment a bit without spending a lot of money, any old flash that has an ability to manually change the power will let you have just as much fun. A Vivitar 283 or 285 is a good recommendation and are easy to find used. Take a few
A Beginners Look At Color Calibration On Your Monitor

Why Monitor Calibration Is Important Why Do I Need A Monitor Calibrator? You just clicked the shutter and on your camera’s screen you can see the amazing image that you’ve just created. Maybe it’s an explosive sunset. Maybe it’s a memorable moment at a family dinner. Maybe it’s your dog being ridiculously adorable (or mischievous). You get the image to your computer, and you adjust the picture to look fantastic. Maybe you hit the Auto button. Maybe you applied a preset you like. Maybe you spent hours painstakingly adjusting the white balance and exposure and layering and masking and blending and manipulating individual color channel luminance to arrive at your masterpiece. Regardless of your method, unless you have a calibrated monitor you have no idea if you are adjusting a greenish tint in your image or one that your screen is imparting on it. Is that brightness adjustment actually necessary, or is your monitor too dark? Luckily there is an easy way to make sure that you are spending your time preforming necessary adjustments to your images. What Is A Monitor Calibrator? The simple answer to this question is – a device you put on your monitor that then runs a computer program that reads how your monitor is displaying color, and then adjusts it to the way it should be. This takes a couple minutes and should be repeated every so often, but more on that later… There are two main brands when it comes to color calibration, X-Rite and datacolor. I have used both of these brands and have no bias to one or the other. When you are looking at a specific price point though, the offering in that category from each brand may or may not have the options you need. Both companies have been in color management for more than 45 years – X-Rite since 1957 and datacolor since 1970. They both offer calibrators from under $100 to more than $500 (for the consumer market). To get a better idea what you may need in a calibrator, lets take a look at some of the things you may consider when shopping for one. Things To Consider Do you edit images in one location, or do you edit in multiple locations? Do you use multiple monitors or a projector when plugged into the same computer? Do you do a lot of printing? What kind of budget do you have? Let’s Take A Look At Each One Of These On Their Own Do you edit images in one location, or do you edit in multiple location? While some people use a laptop and might be editing images in various conditions, others use a desktop and always edit in the same room. One of the features that could be worth looking for on your future calibrator is an ambient light sensor. The color of the light in the room you are editing in has an effect on the way you see your screen. Not only are there differing colors of light bulbs, but if there is a window in the room you edit in, the color and intensity of the light pouring into the room will change throughout the day. When you are comparing different models, some will have an ambient light sensor, while some of the less expensive ones may not. The calibrator I use does have one, but I don’t keep it plugged in all of the time. It reads the light in the room at the time of the calibration, and then I can prompt it to at any point by plugging it and telling the program to take a reading. If you edit in a static location the calibrators can be set up to take a reading on a regular schedule – from minutes to hours between readings. It the light is moving through the room you edit in over the course of a day, the calibration program will make live-time adjustments. Do you use multiple monitors or a projector when plugged into the same computer? Despite the fact that I personally use a laptop and might be just as likely to be editing at a coffee shop in Chile as I am to be in my home office, I do use multiple monitors. On my desk I have a larger monitor that I will often use to expand my work space. I also have a projector that I tote around the country for my workshops and classes. When you are looking for a calibrator, the ability to use multiple monitors, or even a projector can be a distinguishing factor. If you have the need to run more than one display at the same time, and want them to be as close as possible to each other, this is a feature you will need. All monitors are not created equal! The type of monitor you buy – IPS or TFT along with quite a few other factors – will play into the monitors ability to display color, blacks and whites, contrast range, angle of view and much more. This is a wholly different topic that warrants its own tutorial. I will give you a brief look into monitors at the end of this article though. Do you do a lot of printing? If you print your images, the accuracy of the color plays heavily into your bottom dollar. If you have to try four or five times to get the color “close enough,” then you are wasting more money on inks and papers than the calibrator would of cost you to begin with – not to mention the unnecessary frustration. There are a lot more complexities to home printing than a monitors calibration (also warranting their own tutorial), but if your monitor is calibrated your prints will already be much closer to the displayed image. Only the systems over $500 will talk to your printer and put it on the same page as your monitor (no pun intended). Unless
The Quick and Dirty Guide to Photographing Fireworks
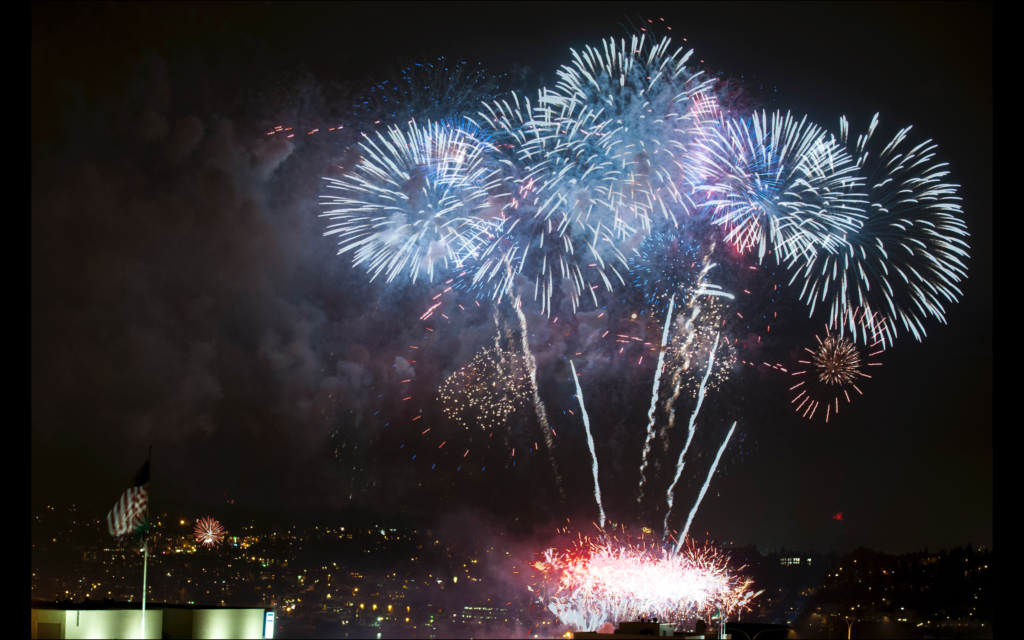
Tis The Season For Pretty Explosions!!! For the average American July 4th brings thoughts of barbecues, family and fireworks. For most photo enthusiasts there is also one more thing; how to get that great firework picture? Overexposed, colorless images of very blurry streaks in the air tend to be the norm for most people on their first couple attempts at capturing fireworks. If your camera is set to Auto or Program mode, the meter is looking at the dark scene around you and choosing far too long of a shutter speed. When you take control and set the camera to full Manual, you eliminate the chance of the camera overexposing your fireworks. Before you start snapping away, you will need a few things… Tools of the Trade A Tripod This doesn’t have to be an expensive carbon tripod, as long as it is sturdy enough to hold your expensive camera gear. A Cable Release You can try to use the 2-second timer on your camera, but it can be very frustrating trying to time the explosions with a shutter delay. A Good Sized Memory Card You will be taking a lot of pictures to delete later. Nothing is worse than filling your card just before the finale. A Fully Charged Battery Do I really need to explain this one? The Technique Now that you have your tools all squared away, lets get to the image. To start out, focus on something bright like a far away street light and then set the focus on your camera or lens to manual. This will make sure the camera is not trying to focus on a dark scene while you are trying to shoot later. When it comes to the look of your firework images, your shutter speed is the most important exposure variable to consider. For a better understanding of exposure and how it influences your picture, check out my tutorial on the exposure equation, here. If your shutter is open, the camera is recording all of the light that passes in front of your lens. If a firework is exploding violently through the sky and your shutter is open for a long period of time, you will have longer streaks. If the shutter is open for a short amount of time, you will have much smaller streaks. Don’t trigger the camera as soon as the explosion occurs though. Wait a split second for the firework to bloom a bit. You will have to do a little experimenting, but I find that a shutter speed between 1/15 and 1 second tend to give me the best results depending on how fast the explosion is moving. Sparkling ash fluttering through the sky will take longer to streak in your shot than new violently exploding bursts. So far we have only set the shutter speed. Your exposure has two more parts to set before we ready to take full advantage of the festivities. If you want to have people’s heads silhouetted in the foreground, you would need to consider your aperture and the depth of field. If there is nothing in the foreground of your image then you really could set your aperture anywhere you want. That being said I usually will set the aperture somewhere in the middle like f8 for instance. The color and the brightness of the fireworks will truly determine your final exposure. I will start at ISO 400 and see if a test exposure is too bright or too dark by shooting a couple of explosions and looking at it on the rear screen. If you end up with white fireworks, you need to take some light away from your exposure. If they are very dim but you can see color, you should increase your exposure. My First Test Exposure 1/4 sec f8 ISO 400 This is a good test exposure to start at. Take a couple of shots at this exposure while the first few fireworks are illuminating the sky. Check the screen on your camera. Zoom in and move around the shots a bit. If it is too bright and you can’t see the colors well, try dropping your ISO to 200 and repeat. Different colors will take more or less time to expose, so you will want to find an exposure that captures the widest range of colors in your scene. Time To Play Around A Bit Now that you have color in your fireworks, try changing your shutter speed. Use the “counting your clicks” method described in the above mentioned exposure equation tutorial. Try longer and shorter shutter speeds to see the results in your image. To create an image with lots of fireworks, the secret is multiple exposures. If you were to leave the shutter open long enough to capture multiple blasts, the streaks would be so long they would obscure the whole image. Most current cameras have a multiple exposure mode in the menus. If you don’t have a multiple exposure mode in your camera, layering and blending images in Photoshop can achieve similar results. For the image to the left, the camera was set to take 3 exposures. Using the same shutter speed, aperture and ISO as your single blast shot, head into the menu and turn on your multiple exposure. Set the desired amount of images (if you have this option) and start clicking away. Now it comes down to hitting the shutter at the correct time to get the blasts to look like you want. Try sticking to 2 or 3 exposures. Too many can look far too busy. Now all that’s left is to get out there and shoot! Try a few different things and shoot a lot of images. Especially when you are trying to learn a technique, remember it doesn’t cost you anything to take a picture but time. You will get a feeling sooner or later for when to fire the shutter and the settings
What? You Have Never Cleaned Your Tripod?
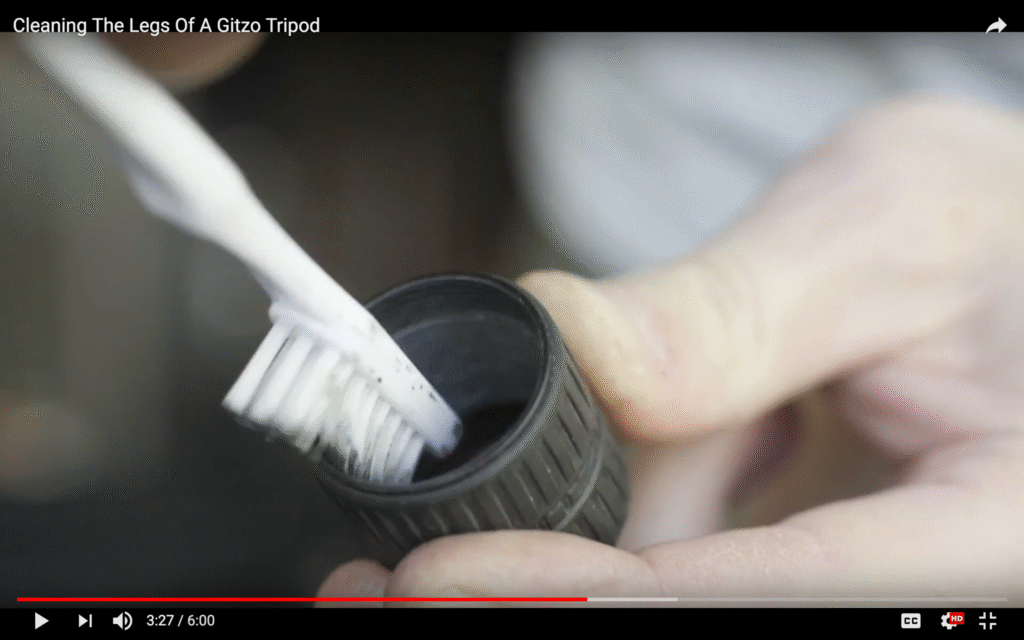
Cleaning and Maintaining Your Tripod’s Leg Lock Do you use a Gitzo, RRS, Mefoto or any other tripod with a rotating leg lock? This video will show you how to clean your legs and also keep them ready for the field for years to come.